Author grazingazer Date Tue Jun 02, 2009 7:48 am Type Tech Article
Keywords
Category Tech Tips
Comments [14 - Post your comments]
Views 878 [Rate Article]
This procedure was all based off of posts I’ve seen by Grazingazer, Club_C and Eaglebeak.
Disclaimer: This was done on my ’82 750 with Hitachi carbs. Other bike/carbs may be different.
Tools :
Flat head screw driver
Phillips screw driver
A small screw driver to adjust your mixture screws (mine a flat head, yours could be different)
Two vacuum gauges (I bought two vacuum test kits from Harbor Freight, came with everything, for $12.99 ea)
Tools as required to loosen your left hand idle set screw (if you have it, mine’s a flat screw driver and an 8mm wrench)
Zip ties
Also, I have read that an adjustable aquarium air valve will reduce the fluctuations but I didn’t worry about it. We don’t sync at idle and at 3000 rpms they were both pretty smooth and easy to read.
Pre adjustment steps:
It would be a good idea to set your valve clearances before you perform this procedure. I recommend doing this since a valve being out of adjustment could cause issues. You can find a good procedure by Matthew here: http://viragotechforum.com/kb.php?mode=article&k=11
If you’re able to run your bike, warm it up to operating temps. The choke needs to be full off BEFORE you can do this procedure.
Adjust your idle mixture screws to 2.5 turns out from SOFT SEAT and set your idle speed i to roughly 1000 rpms.
Run at least one fan before starting this procedure to combat over heating. The more the better.
OK, here we go…..
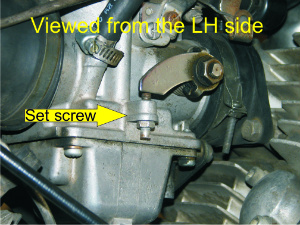
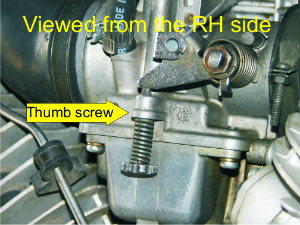
1 – Back the idle set screw (not on all bikes; ignore this step if you don’t have it) on the left hand carb ALL the way out so that the throttle arm is not touching. At this point your idle speed will be set only with the thumb wheel on the right side. Left carb will mirror through the linkage.
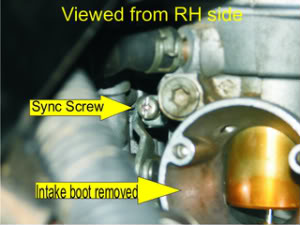
2 – Remove the right carb air intake boot (or otherwise gain excess to the linkage adjustment screw). If you remove the boot make sure to keep it handy. It will need to be reinstalled when you’re running to keep the conditions the same between both cylinders (mine wouldn’t run with it off anyway).
3 – Back the linkage adjustment screw all the way out (well at least until it’s loose; please don’t remove it all the way). Slowly tighten the screw until it JUST makes contact with the linkage going to the left carb. I then slowly rotated the screw in to remove any slop between the individual carb throttle linkages (when I started you could move the RH throttle about an 1/8” before the LH throttle started to move; now they move at the exact same time). Re-install intake boot if removed.
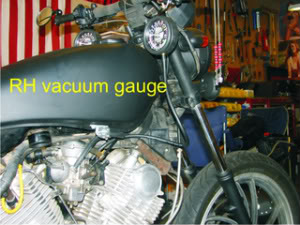
4 – Hook up your vacuum gauges and secure the hoses with zip ties to ensure no leaks. I have manual petcocks so I just installed them to the old petcock vacuum points on my carb mounts. How they will hook up will depend on you personal circumstances. Just make sure that they are both hooked to the same size ports on the carb mounts.
5 – Start your engine. Mine took a little more petting then usual to get started with the gauges hooked up even though she was warm. I think this is because of the larger vacuum area in the lines and the gauges. Give everything a second to stabilize after start.
6 – Proceed to 3000 rpms. Let stabilize for a few seconds and then record your vacuum readings. From this point I just played with the linkage screw until I was dialed in. It’s kind of monotonous at this point but well worth the effort. Take a reading, shut down, remove intake boot, adjust screw, re-install intake boot, start, take reading, wash, rinse, repeat; always repeat. I was able to tell if I went the wrong way or too far etc.
7 – After you get the sync dialed in allow her to idle for a second and set the idle speed to 1000 rpms.
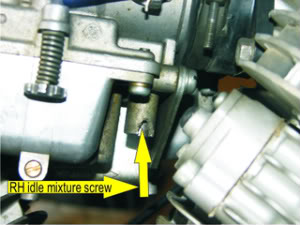
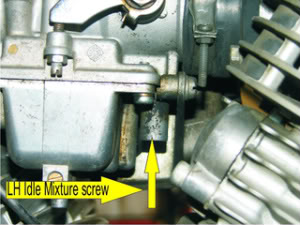
8 – Adjust your idle mixture screws by turning them in until the cylinder starts to sputter and then back them out until it runs smoothly. This was hard for me to hear and I’m not sure I have mine set perfectly so I ordered a Colortune kit.
9 – Double check your idle speed is still at 1000 rpms and set the set screw to the point that there is about a hair of daylight between the throttle lever on the left carb and the top of the screw and locked it down.
10 – Reinstall the intake boot and remove the vacuum gauges.
11 – MOST IMPORTANT!!!! Go on a test ride. Make sure you hit the highway for a good ride. Monitor the throttle response for proper idle mixture settings and the feel of the bike.
After I was done with everything I noticed that the fluctuations on the vacuum gauges at idle were about the same. When I started, it was noticeable that one carb was pulling more vacuum at idle then the other one since the ranges were so different.
_________________