Author akoutlaw Date Wed Jun 18, 2008 6:26 pm Type KB Modification
Keywords
Category Fix It / Mods
Comments [20 - Post your comments]
Views 1247 [Rate Article]
Parts Needed
• harley-Davidson FLH fuel tank
• High-Flow petcock with left outlet.
• 24” of ¼ fuel line
• (4) ¼ fuel line reverse-pressure clamps
• Roll of 1” Metal Plumbers tape
• Piece of 1/8 x 6 x 2 metal stock
• (4) ¼ X 1” bolts with nuts/washers/lock-washers
• (2) 5/16 X ¾ bolts with nuts/washers/lock-washers
• (1) ¼ x 1” Wood Screw
Preparations for the Installation:
• The FLH tank’s crossover feeder outlets pointed inward at a 45 degree angle. With a heat-gun, was able to straighten out these small tubes, bringing them to a straight ninety (or vertical).
The process goes like so:
Step 1. Drain the Virago tank.
Step 2. Disconnect the vacuum and fuel lines to the Virago tank, I carefully removed it from the bike leaving the front and rear bumpers in place.
Step 3. Mount wood screw in vacuum line, effectively capping it.
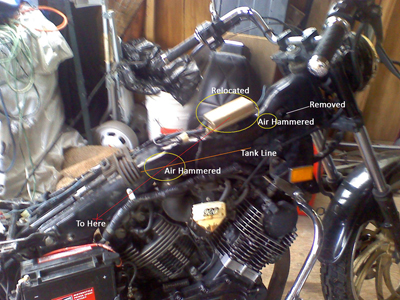 Step 4. Next, the rear of the frame (over the right
carb) is too wide to fit into the FLH tank, so using a body hammer, I
collapsed the frame a little (about three quarters of an inch) to allow
the tank to lay level on the frame. It is done at an angle due to the way
the tank lays across this section. This part of the frame is purely
air-box, so fairly easy to fold in without doing any structural damage to
the frame.
Step 4. Next, the rear of the frame (over the right
carb) is too wide to fit into the FLH tank, so using a body hammer, I
collapsed the frame a little (about three quarters of an inch) to allow
the tank to lay level on the frame. It is done at an angle due to the way
the tank lays across this section. This part of the frame is purely
air-box, so fairly easy to fold in without doing any structural damage to
the frame. Step 5. Several sections of the forward frame were too wide as well, so a small amount of frame modification is necessary, primarily along the right side, ensuring that structural integrity remained intact.
Step 6. I removed the forward rubber bumpers and sawed off the tubes that hold the Virago tank up front, flush with the side of the frame and filed the edges to ensure they wouldn't scratch up the new tank upon installation.
Step 7. I relocated my TCI module to just above the battery on the frame due to it being too wide to fit underneath the tank.
Step 8. I carefully mounted the FLH harley tank after draining it.
Step 9. Due to the fear of drilling holes in my frame, I created a "saddle" for the forward mounts of the FLH tank out of metal "plumbers" tape. Eventually, to be replaced by welding a mounting bolt to the frame. (This saddle was created by running the ¼ bolts through the plumbers tape at the location it needed to be, then bolting down the tank to the saddle. The plumbers tape wrapping around the goose-neck of the frame, then one piece going over the cylinder heads under the frame, forming a triangle along the bottom. I also added ½ inch section of fuel line to the ¼ bolts for buffering).
Step 10. The FLH tank reaches back a little further under the seat, so a custom “saddle” had to be created for this as well. (I took a one eighth thick piece of metal stock and mounted it to the frame on the outside forming a small “deck” under the tail-end of the new tank. I then drilled two holes from the top in which to bolt the tank to).
Step 11. The FLH tank uses a "cross-over" fuel line to keep the sides equal, so I ran the line down under the frame (about nine inches long) connecting the two sides. The difficulty here was ensuring that the line stayed off the top of the cylinder, so I ran the fuel line between the wire harness and the frame, effectively pinching the fuel line close to the frame.
Step 12. Using an eight inch 5/16 fuel line, I connected the fuel line to the harley petcock.
Took it out for a ride, it’s a little wider than the stock Virago tank, so I felt the tank rubbing on the inside of my thighs. The stock Virago seat pinches down on the tank just like before, so I was able to ride the bike before I had everything bolted in place.
NOTES:
• I made sure that all fuel lines had "reverse-pressure" clamps holding them in place.
• The new tank was "snug" in several places along the frame, probably need to go back and touch them up with the body hammer.
• I left the rear rubber mount for the Virago tank in place, as it provides buffering for the new tank as well.
• The harley tank wasn't empty the first time, so being that I can make notes here, make sure the tank is "bone-dry" before attempting any of this.
• Will get a sheet-metal wrapping to surround the goose-neck and forward mounts of the FLH tank, as the bolts and stuff are clearly visible from the side of the bike.
• Will get rubber bumpers installed on the back brace for buffering.
Afterwards
• I spoke to some custom gurus here in Anchorage (thanks to the guys at AK Cycle) and was informed that I could in-fact, drill a ¼ inch hole straight through the airbox located behind the gooseneck which I will do this weekend and thereby remove the forward saddle created via plumbers tape. The rear saddle will remain in place.
• The ¼ inch bolt that I’ll run through the air box will include rubber grommets to prevent the tank from any rattle.