#1: Clutch Replacement
Author: mark75,  Posted: Fri Apr 20, 2007 5:36 am
Has your clutch been slipping or grabbing?
Don't panic, and you don't have leave your bike at the dealer for a week
(or more). Change the plates yourself. You only need a few basic tools and
the necessary parts.
Most of us don't give the clutch much thought
until it starts to go wonky, grabbing or slipping. The usual problem is
the clutch plates, and maybe the springs, both are an easy switch out. The
whole thing can be done in just an hour or two.
I did this on my
'86-700, but it would be pretty much the same for most all motorcycles,
but particularly the Yamaha V-twins.
1. Get your stuff together.
Tools, parts, oil and filter.
Tools:
10mm, 14mm, 17mm sockets,
ratchet, &/or wrenches(spanners), I prefer open/box combination.
5mm allen wrench,
torque wrench,
large plain screwdriver,
paint scrapper, or similar device to remove old gasket material.
Parts:
clutch plates - fiber ~$80,
- steel ~$35,
springs(6) - ~$18,
new gasket - ~$12,
3 quarts oil,
oil
filter,
manual,
clean rags,
Yamabond, or equivalent (because I
hate leaks and take no chances)
As long as you're going into your
bike, you might as well make the best of it and replace all the clutch
pieces. If $$ are really tight, you can probably get by with just the
fiber plates, but the springs are the least expensive part so do them,
too. Fiber plates and springs are most subject to wear.
2. On
center stand, Drain the oil.
3. Remove: Engine guards/crash
bars(if equipped).
4. Unhook rear brake light spring.
5.
remove the rear brake pedal (take note of alignment marks on pedal &
spindle to simplify replacement)
6. remove right foot peg bracket.
7. with 5mm allen wrench loosen clutch cover bolts(in crisscross
pattern)
To help keep up with them, draw an outline of the cover on a
piece of cardboard and stick each one in the corresponding spot on the
cardboard from where they came.
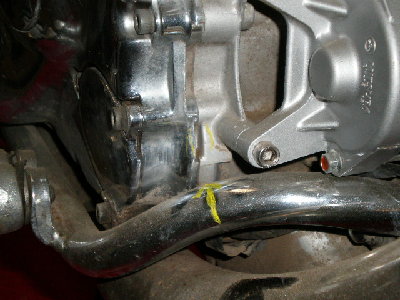
8. remove the oil filter cover,
and to the side of it, at the juncture of clutch cover and the case you
will see the notch (see pic, the yellow arrow).
This is where you can
delicately pry the cases apart. Careful! the cases are soft.
9.
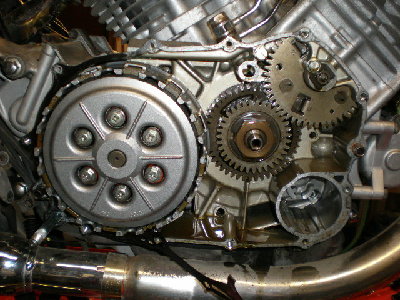
You're in.
10. using a 10mm socket remove the 6 pressure plate
bolts and springs.
Take note of any alignment marks that may need to
be matched for reassembly, or you can make your own with a marker.
11. When you remove the pressure plate(the top plate) you will
notice the throw-out bearings on the center shaft. Be careful when you
remove the PP as these may stick to the back of the plate and fall out, so
place a rag underneath to catch them, in case.
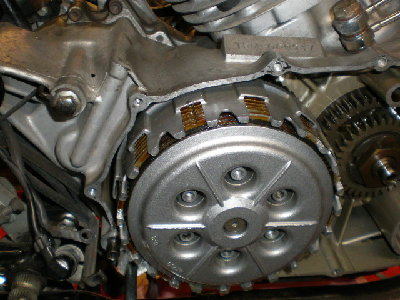
12. Remove the
clutch plates, and stack them in the exact order as they came out.
Incorrect stacking can cause premature clutch failure.
Note: the
clutch fiber plates have alignment notches, a single notch on one "tab"
edge and 3 on the opposite side "tab"(see pic).
13. pre-soak your
new fiber plates in oil.
14. reassemble clutch pack(usually the
first and last are fiber plates)
you will notice the metal plates are
stamped steel, and one side has an edge and the other is rounded somewhat.
There is debate on whether the edge should face in or out. Either way,
they have to all face the same way or excessive hub wear will result.
15. Put the pressure plate over the clutch pack and install the
springs, tighten in a crisscross pattern and torque to 5.8 ft/lbs
16. make sure all the old gasket is removed, apply gasket sealer,
following mfg instructions. It should hold gasket in position along with
the dowel pins in case.
17. reinstall cover and tighten bolt in
crisscross pattern, and torque to 5.8 ft/lbs.
18. reassemble in
reverse order, adjust clutch as outlined in your manual, add oil, and your
done.
for a little more in depth article, see http://www.motorcyclecruiser.com/tech/clutch_replacement
| Description: |
|
| Filesize: |
117.45
KB |
| Viewed: |
14
Time(s) |
|
| Description: |
|
| Filesize: |
112.14
KB |
| Viewed: |
15
Time(s) |
|
| Description: |
|
| Filesize: |
99.05
KB |
| Viewed: |
8
Time(s) |
|
|