#1: Changing Your Stator
Author: mark75,  Posted: Sat Apr 21, 2007 3:31 am
Ok, my battery keeps running down and I have
to recharge it every night. I put the meter on the battery and it says
12.46 volts, I start her up and it reads 11.83 volts. Hmmm,,, check the
regulator and it's fine, check the 3 white wires and sure enough, direct
short. MY STATOR IS SHOT!
Now what do I do?
No worries, it's an
easy job, you could almost do it on your lunch break, but you should wait
until you get home.
First, go to your favorite parts supplier and
order one, or if you are a hard core bargain hunter/gambler, and not in a
hurry, you can hunt one up on eBay(new or used).
In the mean time, get
the other things you will need together:
Basic tools,
5mm
allen head wrench,
10mm, 14mm, 17mm wrenches and/or sockets,
torque wrench,
new gasket,
gasket sealer,
gasket scrapper
or equivalent,
manual,
clean rags,
3 quarts of oil(you will
have to drain the old),
Torx head tool, not sure of designation it's
5mm, Craftsman #T30 ?, but you might be able to use a screwdriver,
blue LocTite,
thin metal ruler or stiff plastic one,
marker(any color),
a piece of cardboard(9 x 11 or so),
and any
comfort items you might want, chips, cold refreshment, Prozac.
UPS
finally brought your new stator, so put your baby on her center stand and
drain the oil.
Remove the left side cover and tool box, crash
bars(if you have them), and the left peg bracket. Mark the shifter and
shaft for easier reassembly alignment and remove it.
Remove the
left cover bolts in a crisscross pattern and stick them into the cardboard
that you have drawn the outline of the case, in the corresponding spot.
When you remove the cover of the clutch adjuster(there's a bolt under
there too), you will have to take all the tension out of the clutch cable
and disconnect the cable from the clutch lever arm(there is a metal tang
that holds the end of the cable in it). Pull the cable out of the case and
move it out of the way.
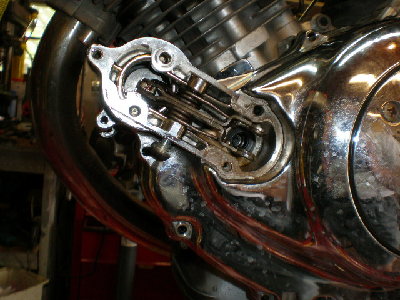
Remove the solenoid lever cover, and the 2
screws that hold the solenoid cover on. This is where the Torx comes in,
the left end is a collar the lever is in, that takes the Torx, remove
that, also there is a bolt underneath in the middle of the lever that acts
as a fulcrum, remove that. The lever will now swing out and detach from
the solenoid. The TORX collar and the fulcrum bolt get the LocTite when
reassembling.
The left cover is now free to come off, but do so
gently, as there is a spiral starter gear that may want to come off with
the cover, but that needs to stay put. As you pull the cover off, make
sure it doesn't come off the shaft(there is a spring holding it to the #1
idler gear)*more about this later*.
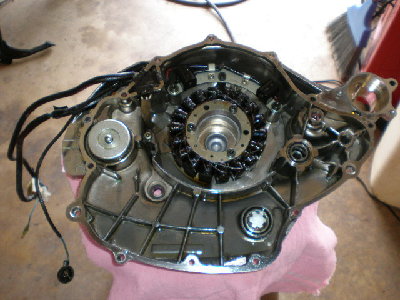
With all the wires
disconnected, you now have the cover off and the stator exposed, note the
position of the wires coming off of it, you want to install the new one in
the same position or the wires wont fit. Note there is a bracket holding
the wires down and away from the rotor. It has one of those crummy
Phillipp's screws, I had to remove it with vise-grips, and replaced it
with an allen head bolt. When you remove the old stator, you will notice
it has spacer that must go on the new one, notice the alignment of the
notch for the wires.(see pic)
Make sure all gasket surfaces are
clean, apply gasket sealer per product instructions, then reassemble in
reverse order.
* When you are putting the cover back on (remember
the gear with a spring?) push it in towards the engine and hold it there
with the ruler as you push the cover on. It's the only way to get things
lined up and the cover to go on.
Tighten in crisscross pattern.
Torque to 5.8 ft/lbs
Don't forget to connect the neutral switch
wire, it's the one with the "buck horn" connector.
Your Haynes
says all this in about 1 paragraph, but I had fun, and I hope this helps.
I did this on an '86 - 700, but it's probably about the same for all the
V-twins. '81-'83 wont have the starter lever to deal with.
| Description: |
|
| Filesize: |
117
KB |
| Viewed: |
25
Time(s) |
|
| Description: |
|
| Filesize: |
116.81
KB |
| Viewed: |
25
Time(s) |

|
| Description: |
|
| Filesize: |
99.59
KB |
| Viewed: |
40
Time(s) |
|
|